What's up with this
banner thing?
If
you don't see a navigation bar on the left, CLICK HERE
|
|
|
Amateur
Auto Restoration
Part Three:
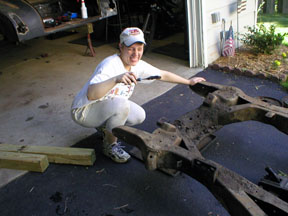
Cleaning Up and Stripping I’ve found that at least 80% of auto restoration is nothing more than cleaning old car parts. At one time, these cars were used as daily drivers on sub-standard roads and it shows. Grease, mud, paint, tar and asphalt have attached themselves to the hard parts of a car and cling with an almost supernatural grip. As a restorer, it’s your job to remove all of it before proceeding. I have techniques that I use based on what is being cleaned, ranging from simple soap and water to sandblasting. The key is to use the right technique for each part. You won’t sandblast plastic or glass, and you won’t try to clean greasy suspension parts with mild soap and water. Sometimes you’ll use a series of cleaning steps to get a finished part: scraping, then degreasing, then sandblasting, for example. You will quickly learn to use what works best for each situation. Once the part is clean, it is also your job to strip the original coating from the part so you can refinish it from the bottom up, starting with fresh, clean metal. By degreasing, stripping and refinishing parts as you remove them, you can amass a large number of ready-to-install parts in a relatively short period of time. As the chassis phase of the restoration continues, you’ll be glad to have them finished and ready to go so all you have to do is bolt them on—this is the real fun of restoration. In this way, your chassis comes together very quickly, lending you confidence and showing the Doubters that you truly do know what you’re doing. I have to emphasize that nothing here
is beyond your abilities, even if you’ve never done anything like this before.
If you can wash dishes, you can definitely handle this part of your car’s
restoration. It isn’t fun work, but it is easy and absolutely necessary for
quality results. You can do it! SCRAPING The first technique you’ll discover
is scraping, which is usually necessary simply to find all the bolts you need to
remove during disassembly. I keep a variety of metal and plastic scrapers handy
and have “customized” a few screwdrivers for just this purpose. I also have
some dental picks for really tight areas. Scraping isn’t difficult nor does it
require any experience, so I won’t go into a lot of detail on it, just make
sure you have something under the part as you’re scraping the crud
off—newspaper, plastic, whatever. It makes a BIG mess.
PRESSURE
WASHING Once you’ve scraped off everything you can reasonably reach with a scraper, you can try (again) to rinse it. Very high pressure (1200+ PSI) water works pretty well for junk that has been loosened by scraping, though it isn’t too good at cutting through oily stuff without adding some sort of soap. Fortunately, most homeowner-type pressure washers have provisions for adding detergent to the stream, which is a great help. If you don’t have access to a pressure washer at home (garden hose pressure is typically between 40 and 80 PSI, hardly enough to blast dirt off your skin, let along decades-old steel), take your parts in a laundry basket to a DIY carwash equipped with a high-pressure hose. Bring along some stiff bristle brushes to remove the grime, some of your cleaners, then blast it away using the pressure nozzle. Please don’t use the soap brush at the car wash for this—somebody is going to wash his car with that brush after you’ve filled it with grease, grime and grit, and it’ll ruin his day, not to mention his paint. Be courteous if you’re using public facilities for cleaning parts.
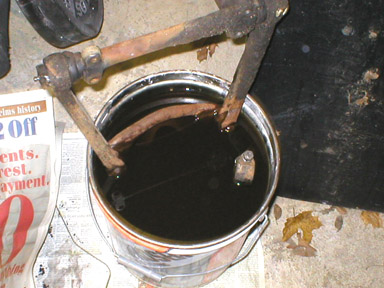
If scraping, pressure washing and brushing don’t remove all the crud and underlying finishes, you’ll have to bring in the third line of attack: chemicals. CHEMICALS Chemical cleaning is serious business. There are chemicals that help, there are chemicals that hurt and there are chemicals that can kill. Don’t assume that because it is the most caustic, flammable, poisonous substance you can find that it is also the best solution for cleaning parts. Use the minimum you can to do the job. Also, there are companies out there who specialize in environmentally-friendly cleaners, though my success with them has been mixed, so I won’t mention any specifics beyond caveat emptor! I have a few different cleaners that
I use regularly, including (from least dangerous to most): Dawn
dishwashing detergent (it really does take grease out of the way), Simple
Green, TSP (tri-sodium phosphate, a heavy-duty powder-form cleaner available
at any home improvement store), oven cleaner, paint thinner, acetone, etc. For
removing the usual grime, I’ve rarely had to use anything stronger than Simple
Green with a small scrub brush and some hot water. I save the stronger solvents
for wiping away any greasy residue that may remain after a thorough
cleaning.
Again, like removing bolts, time is your friend. Give the cleaner time to work and agitate the surface of the part to let it penetrate to the metal below. Most cleaners operate by lowering the surface tension of water, allowing it to penetrate into smaller holes and crevices in the crud to push it away from the metal’s surface. Some cleaners coagulate around the oily particles and further reduce the grime’s hold on the metal. But none of this will happen immediately. If necessary, wrap the part in plastic and let it sit in the sun for an hour, soaking. I have yet to meet any naturally-occurring road grime that could stand up to a coating of oven cleaner sitting in the hot afternoon sun for a few hours. For the body, there are some who prefer to “dip” the sheet metal in a vat of solution that will remove dirt, grease, old paint, rust, bondo and just about anything else and leave you with fresh, clean metal. For many years, I believed that this was the ideal solution but after talking to experts and seeing some mixed results, I’ve changed my mind. Here’s why: the chemicals will get into every single crevice, groove and joint on the car and remove everything but the metal. Great, right? Unfortunately, some of these areas will be inaccessible to you when you refinish the body and will become an ideal place for rust to start. In addition, I have heard more than one story of these chemicals not being adequately rinsed from these nooks and crannies, only to seep out after final paint has been applied, months or even years later. As a perfectionist, I had a very hard time resigning myself to the fact that having old coatings and even some rust and grime in remote areas of the body is better than cleaning it all out, but I truly believe it is the best solution. For the rest of the body panels, there is… MECHANICAL
CLEANING In many cases, once you’ve removed a bulk of the crud from the part with a combination of scraping, washing and stripping, you’re left with a part that may still retain its original coating, some grease and grime trapped in corners and probably rust. The only way to remove the rest of this stuff is by mechanical methods. It is also at this point where you have to take additional precautions and protect your fingers, eyes and skin from debris that can be coming off the parts at very high speeds. Please be careful and use common sense. Mechanical cleaning is scraping’s big brother. It involves power tools: sandblasters, wire wheels, die grinders, etc. It is vastly more aggressive than any of the methods discussed so far, so it is critical to know which methods are appropriate for your vintage parts. Choosing the wrong technique can destroy irreplaceable old metal. I have a variety of small wire brushes that I use for intricate parts with loose crud still clinging to them. They’re like small toothbrushes, but have metal bristles, and work quite well. For slightly tougher stuff, I have several wire wheels that I can chuck into my hand drill to blast it off, though in many cases, the wire wheels on drills tend to burnish the coatings instead of removing them. And unless I’m working on a heavy steel or cast iron part, I use gentle pressure to prevent the wheel from scoring the part. I also have a brass wire wheel mounted to one side of my bench grinder for cleaning bolt threads and other delicate parts, but again, it tends to burnish some coatings instead of removing them. In some cases, wire brushes and
wheels won’t effectively remove paint, especially decades-old enamels that
have hardened and baked onto the parts. This is where you’ll bring in the
heavy-hitter of cleaners: sandblasting.
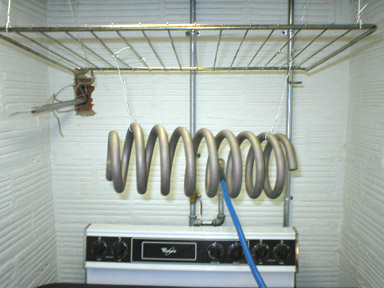
I have found that my enclosed blast cabinet is about the most useful tool I’ve
ever purchased and I can get any part that will fit in it down to bright metal
in a matter of minutes. It works wonders on suspension components, springs,
housings, castings and even small engine parts. You can change the abrasive and
air pressure you are using to match the part: soft walnut shells can be used to
clean delicate brass parts and aggressive iron oxides can be used to instantly
strip rust and paint off of forged steel suspension components. The effect is
quite amazing, like painting in reverse. When you pull the part out of the blast
cabinet, it is like new (probably better than new, since there won’t be any
mill scale or casting flash on it), ready for top coating. Best of all,
there’s no mess—all the dust is contained in the cabinet.
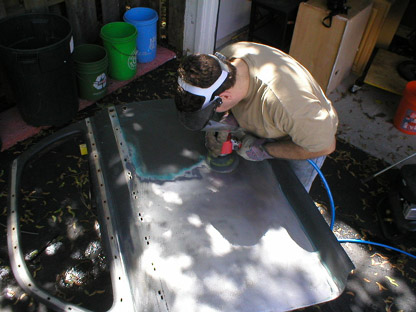
Bigger parts can be cleaned outside with a sandblaster. There are two styles: the siphon type (which uses the pressurized air to create a vacuum to suck the media into the air stream and direct it at the part), and the pressurized type (which pressurizes a reservoir of media and forces it out a nozzle under pressure). The pressurized type is far more effective and should be the only choice if you are working on an area larger than, say, the palm of your hand. Trying to make a siphon blaster work on larger areas is an exercise in futility—you’ll spend the rest of your life trying to sandblast a car frame with one of these. Sandblasting brings its own hazards and certainly isn’t a cure-all solution. First, it is very messy. You’ll be dirty from head to toe, even in places where you thought sand couldn’t ever reach. Next, it is noisy and creates a cloud of dust if you do it out in the open, which your neighbors may not appreciate. Without proper safety precautions, such as protection to your body and most importantly, your lungs, it can make you very sick. Finally, the heat and pressure of all that sand hitting thin, flat sheet metal can warp it, sometimes even beyond repair. So sandblasting your vintage iron involves more than just aim and shoot. I use sandblasting on the frame, larger suspension components and only select places on the body such as the floors, doorjambs, window frames, rocker panels and firewall. I’ll say it again: NEVER, EVER sandblast large expanses of sheet metal such as your hood, roof, doors or fenders—if you aren’t experienced, you’ll ruin the parts in a second. If you have concerns, find a professional sandblaster in your area and enlist his services. They are surprisingly inexpensive. It is important to note here that sandblasting is not the best way to remove grease and soft grime from parts because it tends to stick to the grime instead of cutting it away. For this reason, I rarely sandblast a part before pressure washing or scraping it. If you can’t sandblast it, how exactly do you strip the sheet metal? Sandpaper. I use 80-grit on my DA (Dual-Action) sander or my buffer/grinder with a flexible pad. It is a little slower than sandblasting, but much safer for you and the metal. Eastwood sells some abrasive-impregnated foam wheels that do a fine job of getting into smaller areas such as rain channels and body moldings, and you can also use your wire wheels in really tight spots. The sandpaper technique leaves a nice “tooth” on the metal to which the first layer of primer will easily bond. For heavily rusted areas, you’ll be cutting them out anyway (or at least I hope you will be), so you don’t need to devote a lot of attention to sanding out heavily pitted areas or removing perforation at this point.
Sanding also won’t remove any micro rust that may still be in the metal—that comes later. I’ll tell you all about it in the next installment: Paints & Coatings. E-mail me at toolman8@sbcglobal.net This page accessed Thanks, Fidget! |