What's up with this
banner thing?
If
you don't see a navigation bar on the left, CLICK HERE
|
|
|
June
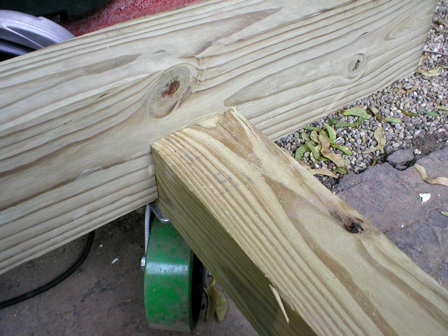
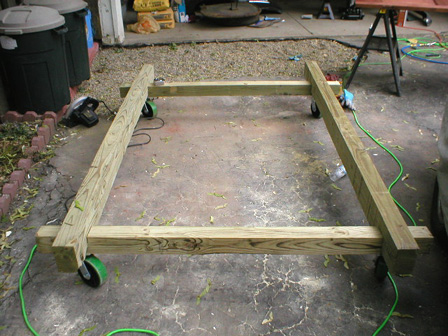
29, 2003 Building a Body DollyI decided that since I'm going to be pulling the body off the frame shortly, but I don't have a rotisserie yet, I should build something on which I can store the body but still keep it mobile. I didn't want to spend a lot of money or invest a lot of time in it either, since it was only temporary. Finally, it had to be easy to store so it didn't eat up all my (limited) storage space. As a former carpenter, building the dolly out of wood was the obvious choice. No expensive materials, no welding and durability that was more than good enough for the purposes I was proposing. I bought a pair of 4x6x8 beams, intending to use them under the body mounts, and a pair of 4x4x8s as cross pieces to hold the rig together and to mount the casters. These timbers should easily handle the ~1500 pound body shell (and probably a lot more!). The problem turned out to be the casters--I wanted the dolly to roll in any direction, be able to be moved outside or inside over a small lip on the pad of my garage and be able to handle storing the body for an extended period of time. As it turns out, casters that can do all this are quite expensive. I needed large diameter wheels so they could roll over the garage lip. I needed wheels that would roll easily with the heavy body on them, but that would not chew up my asphalt driveway, so that meant some sort of rubber or plastic. I needed wheels that wouldn't get flat spots if they were used to store the load for an extended period of time. Finally, I needed them to be able to handle at least 500 pounds each for safety. Not so easy to find, it turns out. The first quote I got was well over $180.00 for a set of four made of a synthetic rubber molded to a plastic wheel. Yow! The second quote was not much better, and involved a solid rubber wheel with a metal insert for $39.27 each. Then a fellow at CasterConnection.com called me up and said he had four 6"x2" polyurethane-over-steel swivel casters that would do everything I wanted them to do and had a load rating of 1200 pounds each. Bottom line? $16.00 each. I told him to have them ready to go by the end of the day and I would pick them up (he was a local distributor). So today I put the thing together. For fun, I decided that I wanted to assemble it using traditional wood joinery techniques most often used in timeframe houses and post-and-beam barns. By notching the wood precisely, a tight, secure fit can be achieved, yet it does not require any tools to assemble or disassemble the dolly. It was kind of a fun project, and I got it done for less than $100.00.
I designed the dolly to support the body using the body mounts under the rocker panels. I've seen dollies that just use the floor, but since I have to do some welding on mine, I thought that it would be better to use points I knew to be strong enough. I also wanted clearance to work on the floor area if I wanted to. For the front crossmember, I positioned it approximately under the dashboard to carry the weight of the front end, which would hang off the front of the dolly about two feet. In the back, I positioned the casters a little farther back to help hold up the trunk area, which will hang off the dolly. If necessary, I have enough wood left over to build a support to hold up the rear end using the axle kick-up area. I attached the casters using 2" stainless steel wood screws and some fender washers. I located the casters under the joint because this is where the load will be concentrated, and put it all together. The joints were nice and tight (some too tight, which I adjusted), and held the dolly square. The notches also keep the crossmembers vertical--they have a tendency to tip over since they're only balanced on two swivel casters--once they're installed. It was a bit of a wrestling match to get it all together, but once it's together, it doesn't need any additional attention and won't come apart under load.
Finally, I tested it a bit by rolling it around and found that the polyurethane rolls very easily. This might change a bit once there's 1500 pounds of Buick sitting on it, but it climbs the lip into my garage quite easily, just as I wanted. In the garage, I broke it down again for storage until I'm ready to pull the body, maybe as soon as this weekend.
My plan for removing the body is that I will raise the car up as high as I can, support the body under the rocker panels using jackstands and 4x4 timbers to distribute the load evenly. Then I'll lower the frame out from under it. If I position everything properly, it should just roll right out from under the body. Then I can lower the body onto the dolly. I may break down and use some wood screws to secure the body to the dolly through the body mounts--we'll see how it sits once it's on there. I've also started a new feature at the top of the page under the hour count. I'm calling it "One Year Ago" so that you can see progress now that we're more than a year into this project. Any time there's a day that overlaps or is close, I'll link to it so you can see the difference that a year makes. I hope you enjoy it. Additionally, you'll notice that I got my quality digital camera back. What a difference! Previous
Restoration Day E-mail me at toolman8@sbcglobal.net This page accessed Thanks, Fidget! |